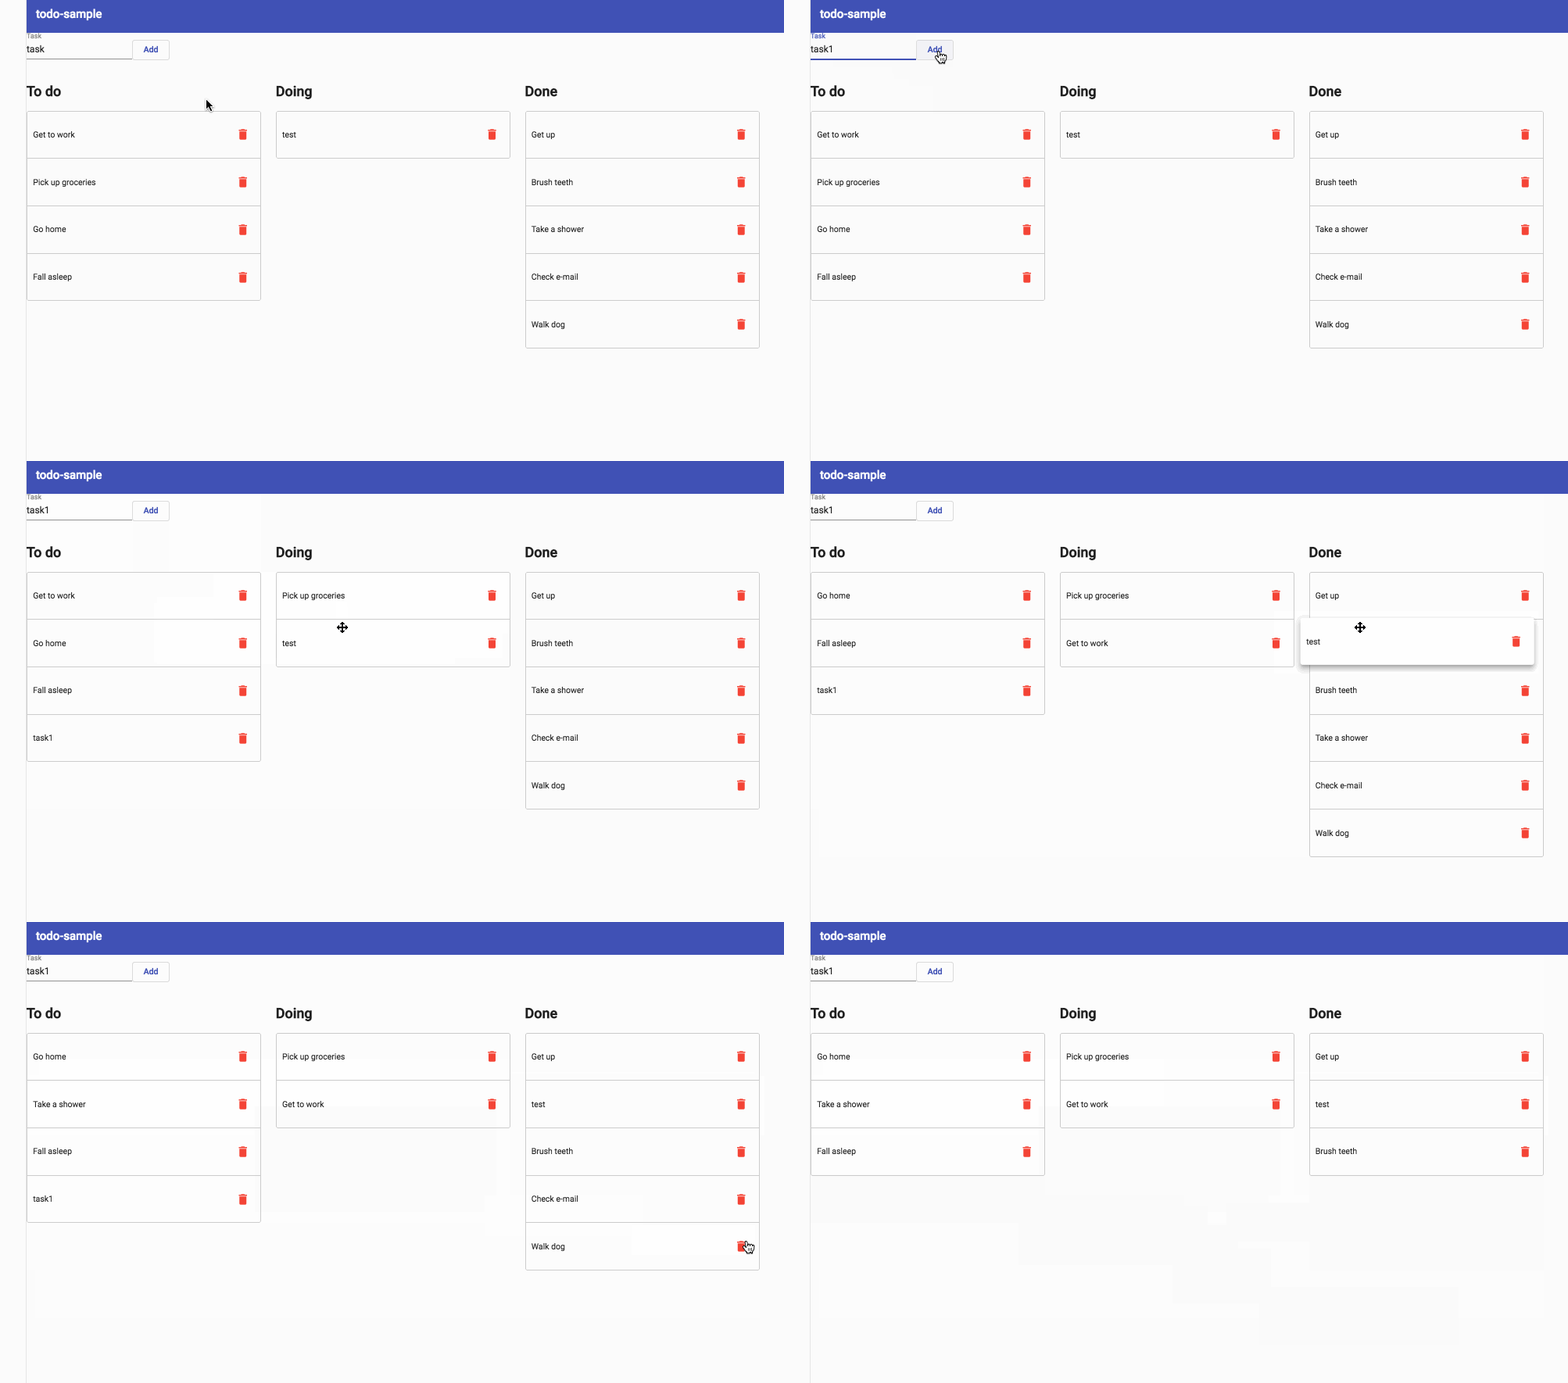
Angular7がリリースされてCDKにDragAndDropが入ってきました
ということで簡単なTODOアプリを作ってみます
内容的にはもはや何番煎じだって感じですが実際に自分で触ってみたほうがいいなと思ったので残しておきます
動作環境
$ npx ng --version

     _                      _                 ____ _     ___
    / \   _ __   __ _ _   _| | __ _ _ __     / ___| |   |_ _|
   / △ \ | '_ \ / _` | | | | |/ _` | '__|   | |   | |    | |
  / ___ \| | | | (_| | |_| | | (_| | |      | |___| |___ | |
 /_/   \_\_| |_|\__, |\__,_|_|\__,_|_|       \____|_____|___|
                |___/


Angular CLI: 7.0.2
Node: 9.3.0
OS: linux x64
Angular: 7.0.0
... animations, common, compiler, compiler-cli, core, forms
... http, language-service, platform-browser
... platform-browser-dynamic, router

Package                           Version
-----------------------------------------------------------
@angular-devkit/architect         0.10.2
@angular-devkit/build-angular     0.10.2
@angular-devkit/build-optimizer   0.10.2
@angular-devkit/build-webpack     0.10.2
@angular-devkit/core              7.0.2
@angular-devkit/schematics        7.0.2
@angular/cdk                      7.0.1
@angular/cli                      7.0.2
@angular/material                 7.0.1
@ngtools/webpack                  7.0.2
@schematics/angular               7.0.2
@schematics/update                0.10.2
rxjs                              6.3.3
typescript                        3.1.3
webpack                           4.19.1
install,project作成
cliでnewすると対話形式でいくつか質問される(7から)ので答えます
$ npx ng add @angular/cdk
$ npx ng add @angular/material
+ @angular/material@7.0.1
added 68 packages in 14.639s
Installed packages for tooling via npm.
? Enter a prebuilt theme name, or "custom" for a custom theme: indigo-pink
? Set up HammerJS for gesture recognition? Yes
? Set up browser animations for Angular Material? Yes
materialの雛形追加
とりあえずナビだけ
npx ng g @angular/material:material-nav --name side-nav
サーバ起動
npx ng s
実装
ドキュメントは下記
Drag and Drop | Angular Material
https://material.angular.io/cdk/drag-drop/overviewmaterial.angular.io
サンプルにすでにそれっぽく動かせるコードがあるのでそこからすこし手を加えてTODOリストを作ってみます
- サンプル
Drag&Drop connected sorting - StackBlitz
- テンプレート側
#todoList="cdkDropList" でテンプレート変数にディレクティブのインスタンスを代入
[cdkDropListConnecedTo]="[doneList]"でどの箱とつながっているかを定義
配列になっているので複数記述できる感じですね
サンプルだと箱が2つなのでもう片方の箱のインスタンスを指定しています
[cdkDropListData]="todo"で対象の箱の初期データを渡しています
データの内容はtsファイルの方に記述されています
(cdkDropListDropped)
cdkDropList配下のcdkDragの要素に対するドラッグが終わったらイベントを受け取るようになっています
drop関数では対象のタスクが同じ箱内で順番だけが変わった場合はmoveItemInArray
別の箱へ移動した場合はtransferArrayItemを呼び出してそれぞれ適切なデータをとってきて移動させています
めちゃくちゃわかりやすい!
今回はこのサンプルに下記追加してみます
- doingのリスト
- タスクの追加機能
- タスクの削除機能
doingのリスト
他2つの箱にならって箱を追加
各箱の
cdkDropListConnecedToを3つ相互に接続させるように修正
これだけですね
データの追加
テキストフィールドを用意してクリックイベントで対象データ(todo)に追加するだけ
- todo-list.component.ts
  addTask(task: string): void {
    this.todo.push(task);
  }
- todo-list.component.html
  <mat-form-field class="example-full-width">
    <input #task matInput placeholder="Task" value="task">
  </mat-form-field>
  <button mat-stroked-button color="primary" (click)="addTask(task.value)">Add</button>
あとはAngular側がよしなにやってくれます
データの削除
こちらも対象のデータから削除するだけ
- todo-list.component.ts
  deleteTask(data: any[], index: number): void {
    data.splice(index,1);
  }
- todo-list.component.html
    <div class="example-box" *ngFor="let item of doing; let i=index" cdkDrag>
      {{item}}
      <button mat-icon-button color="warn" (click)="deleteTask(doing,i)">
        <mat-icon aria-label="Example icon-button with a heart icon">
          delete
        </mat-icon>
      </button>
    </div>
最終的にこんな感じになりました

まとめ
なんて楽なんだ!という印象でした
ドラッグアンドドロップのUIは普通に実装ってなるとちょっと気が重くなる感じのイメージだったのですがCDKを使って実装すれば簡単に実装できそうです
これ使って自分用にTODO作るか!っていうくらい簡単でした
CDKは他にも色々機能があるので調べて使ってみたいと思います
サンプルのコードは下記に置きました
